How to use Unix/Linux commands at the Windows command prompt

A lot of us who use Linux at work/school or have always grown up using unix commands for years and more often than not, there might have been instances where a ls command comes more naturally than the dir command at the command prompt in Windows. For the most part, a lot of us work around this drawback using the excellent tool: Cygwin. Cygwin is available for windows users here.The Cygwin tools are ports of the popular GNU development tools for Microsoft Windows. They run thanks to the Cygwin library which provides the UNIX system calls and environment these programs expect.

With these tools installed, it is possible to write Win32 console or GUI applications that make use of the standard Microsoft Win32 API and/or the Cygwin API. As a result, it is possible to easily port many significant Unix programs without the need for extensive changes to the source code. This includes configuring and building most of the available GNU software . Even if the development tools are of little to no use to you, you may have interest in the many standard Unix utilities provided with the package. They can be used both from the bash shell (provided) or from the standard Windows command shell.

While Cygwin would be an obvious choice for many Unix/Linux power users, there is an excellent and a much simpler alternative to using Cygwin. In this article, we will show you how to run your Unix commands right in the windows command prompt.

For this, we will be using CoreUtils. CoreUtils is available through Sourceforge and is available for download here. If you look in here, there are a number of GNUWin32 packages available, the one we would be using is the CoreUtils package. CoreUtils is a collection of basic file, shell and text manipulation utilities of the GNU operating system. These are the core utilities which are expected to exist on every OS. And when I talk about File utilities, they include chgrp, chmod, cp, dd, du, ln, ls, mkdir, mv, rm, touch, vdir among others. A sample of the text utilities include cat, cksum, cut, join, md5sum, shasum, sort, split etc. The shell root commands include echo, chroot, hostname, nice, pathchk, tty, who, whoami and yes su. So it is pretty much the whole nine yards here… The direct link for download of the CoreUtils package available through SourceForge is available here.

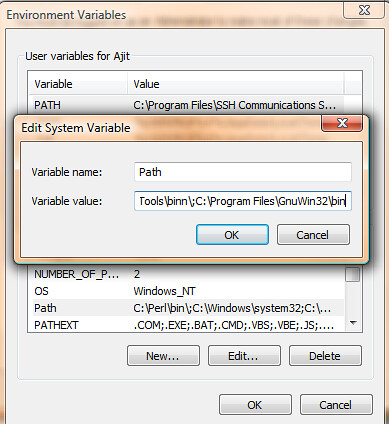
Once installed, you will need to add the path to the utilities to your PATH environment variable. Follow the steps below to achieve this

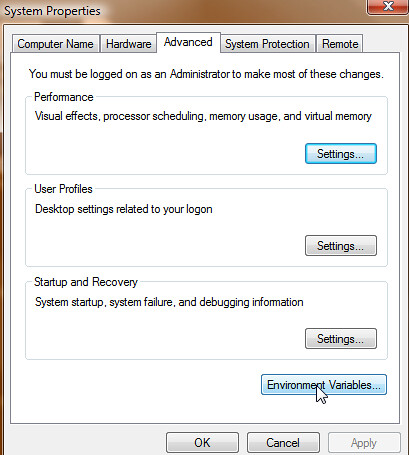
1. Click on Start –> Run and enter sysdm.cpl to bring up the system properties Dialog

2. Click on the Advanced tab –> Environment variables button Path to environment variable

3. In the System Variables pane, scroll down to Path and then click on edit.

4. Under Edit System Variable, in the variable value, at the end of the line , type the following including the semicolon which separates the individual elements in the path variable. ;C:\Program Files\GnuWin32\bin

env variable properties

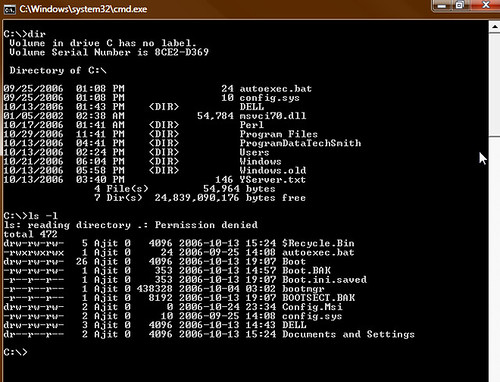
Congratulations !! You have now added the GNUWin directory to your path and Unix commands can now be executed directly from the command line and run natively on the Win32 command prompt without the need for any emulation layer as shown below using the example of dir vs ls

command prompt comparing dir vs lsDownloads and Sources

1. Download CYGWIN

2. Download CoreUtils

Error: Cannot retrieve repository metadata (repomd.xml ) for repository: updates-newkey.

  1. ISSUE: Unable to use yum to update on FTP100
  2. ERROR MESSAGE: Error: Cannot retrieve repository metadata (repomd.xml) for repository: updates-newkey. Please verify its path and try again
  3. SOLUTION:
  1. Downloaded the updated and signed fedora-release package.
  2. Verify that the package sha1sum matches 259165485c16d39904200b069873967e3eb5fa6e:

sha1sum fedora-release-9-5.transition.noarch.rpm

  1. Install the package via rpm:

su -c 'rpm -Uvh fedora-release-9-5.transition.noarch.rpm'

  1. Move on to importing the new key.

Import the new key

  1. Verify and import the new GPG key to your GPG keyring as per https://fedoraproject.org/keys.
  2. Import the key into the RPM database:

su -c 'rpm --import /etc/pki/rpm-gpg/RPM-GPG-KEY-fedora-8-and-9'

  1. Use your update tool to get and install any new updates from the new location

Password Protect Folders

Step 1. Configure Apache to Allow Access Authorization
You need to find the httpd.conf file on your Linux server.

This file is the Apache web server configuration file that includes lots of very useful Apache web server controls.

For now, simply open it using a text editor. For Fedora users this is done by simply going to /etc/httpd and opening httpd.conf. For others using various flavors, try using this command to identify the location of the httpd.conf file and edit it: locate httpd.conf

Once you open this file using a text editor, please scroll down until you see not the first but the second occurance of this text: AllowOverride None

Change the line that says:
AllowOverride None
to instead say:
AllowOverride AuthConfig

Be sure to NOT CHANGE THE first occurance of this in the apache file which is the default. Change the second occurance which is actually the overide. This is VERY IMPORTANT! If you run into trouble make a backup of your httpd.conf file (type: cp httpd.conf httpd.conf.back) and then try using this example. Be sure to reboot the server after you copy our example file.

Step 2. Identify the Folder/Directory to Protect
You should now identify which folders (aka Directories) under your web server you would like to protect. For instance if I want to only allow a certain list of users to access my html files under the Private folder it would look something like the following.

On the Linux server the actual directory path would be:
/var/www/html/Private
On the web browser the path would be:
http://office.server.com/Private

Obviously, I'm giving an example to help you see the difference between the folder/directory name on the Linux server and how it looks to web browsers. You MUST change to the appropriate directory/folder when using the steps below. So in my case I type this command first before beginning on my Fedora server:
cd /var/www/html/Private

Step 3. Add Access Files to the Folder
Once you identify the folder you wish to safeguard, then you need to create two files in this folder. The files are: .htaccess and .htpasswd. The .htaccess file displays the access login information needed for users and also includes the list of specific users who can login. The .htpasswd file includes the individual users and their passwords.

Create .htaccess file in your Folder by using a text editor to create .htaccess. Notice that you must include the . (dot) before the file name!

The file should atleast include these lines:
AuthName "Login to the Private Area"
AuthType Basic
AuthUserFile /var/www/html/Private/.htpasswd
Require user andrea

Note that the AuthName requires quotes and whatever is in quotes will display on the login window when a user tries to access your private folder with a web browser. It is vital that you properly set the path for the AuthUserFile and obviously replace the word Private with whatever folder you are trying to password protect.

Also be sure to include the user login names of the people you plan to allow to this folder next to the Require user line. In my case, I simply added myself to this folder as a user (andrea).

Now, create the .htpasswd file in the same Folder but NOT by using a text editor. Instead use this command from the command line on your Linux server.

Type this command at the prompt:
htpasswd -cmb .htpasswd andrea ann2cute

Note that you must use your own name and password (replace andrea and ann2cute) and that the option cmb does the following: First it forces Creating of a new .htpasswd file. Since this is your first time adding a user it is necessary. Next the m option forces encryption and b allows you to include the user name and password immediately. In my case I created a new .htpasswd file, then added the user andrea and her password ann2cute.

Step 4. Add Additional Users
To add users you simply need to edit both files again. First, add a user to the .htaccess file by opening it in a text editor and including the new person (my example is bradley).

The .htaccess file should include these lines:
AuthName Login to the Private Area
AuthType Basic
AuthUserFile /var/www/html/Private/.htpasswd
Require user andrea bradley

Remember to save the file when youre done adding the new user!
Now add the user (my example being bradley) to the .htpasswd file using this command:
htpasswd mb .htpasswd bradley brad4chad

In my example, I used the htpasswd command to add using encryption the user bradley to the .htpasswd file that already exists and include his password as brad4chad. That's it!

Step 5. Test the Password Function
Now test that the Apache server is accepting this new protected folder by going to it in a web browser. In my case I test the url http://office.server.com/Private and up comes a pop-up window that requires User Name and Password. I type in my user name and password and instantly I see the index.html page I put in my folder! People who don't have a login won't get access to your web pages within this folder.

What if it didnt work? Almost always this is a result of the httpd process not being restarted. You can easily restart this process to pick up the changes in your updated httpd.conf file by either rebooting or restarting the process. A reboot works fine, so long as you can tolerate a web server outage for a minute or two. Or, on most flavors you can type this command as root user: ./httpd start

Step 6. What About Removing Users
There may come a time when you need to delete users from the access. You can do this easily enough by again editing the .htaccess file and running a command to delete the user from the .htpasswd file.

First, edit the .htaccess file and remove the user you do not wish to allow access to and save the file.

Second, delete the user from the .htpasswd file by typing this command at the prompt: htpasswd D bradley
The option D is for delete. It should prompt you that user bradley was deleted.

Good Links
  1. http://linuxhelp.blogspot.com/2006/02/password-protect-your-website-hosted.html
  2. http://www.reallylinux.com/docs/htaccess.shtml
Good Site/tools that can be used on LAMP environment
  • http://pchart.sourceforge.net/

Useful Ajax Auto Suggest scripts collection

This post is a collection of some interesting and useful Ajax Auto Suggest scripts ready to use (from beginner or professional web developers) in your web projects. This collection includes standard auto suggest scripts, del.icious tag suggestion, autosuggest control to search images on Flickr, and advanced table filter with auto suggest control.

If you want to suggest other interesting links please add a comment, thanks!

1. Ajax Auto Suggest v.2
The AutoSuggest class adds a pulldown menu of suggested values to a text field. The user can either click directly on a suggestion to enter it into the field, or navigate the list using the up and down arrow keys, selecting a value using the enter key. The values for the suggestion list are to provided as XML, or as JSON (by a PHP script, or similar). This auto suggest class is very simple to customize and reuse in your web pages. Take a look here for the demo.

2. Woork PHP component: Autosuggest
Woork Autosuggest is a simple "PHP component" ready to use which implement autosuggest feature using PHP and MySQL. The component is lightweight (only with 8Kb) and ready to use simply customizing some parameters.

3. Spry Auto Suggest Widget
Spry Auto Suggest Widget (provided from Adobe Labs) use Adobe Spry framework to implement auto suggest feature in a input field. This is an example of using a Spry region and non-destructive filter to create an auto suggest widget. The suggestions can be displayed in any HTML structure. Spry uses the the tag ID to identify the suggest list container. In this example, there are three different HTML structures based on: table, div-span, ul-li.

4. Facebook-Like Auto Suggest
Guillermo Rauch's Facebook-like Auto Suggest is another auto suggest script which simulate Facebook auto suggest feature. It works by caching all the results from a JSON Request and feeding them to the autocompleter object. When a item is added as a box, it’ removed from the feed array, and when the box is disposed it’s added back, so that it becomes available in the list when the user types.

5. jSuggest 1.0

jSuggest is yet another auto-completer for your text input box. It mimics the functionality of Google suggest. jSuggest will also bind item selection to your up and down arrows and also allow you to select the suggestions using your mouse.

6. Yahoo! UI Autosuggest Control
Yahoo! UI Autosuggest Control uses AutoComplete to find images by tag from the Flickr webservice. A simple PHP proxy is used to access the remote server via XHR. The generateRequest() method has been customized in order send additional required parameters to the Flickr application. The formatResult() method has been customized in order to display images in the results container, and the default CSS has been enhanced so the results container can scroll. Finally, a itemSelectEvent handler has been defined to collect selected images in a separate container.

7. CAPXOUS.AutoComplete
CAPXOUS.AutoComplete is a standalone widget without dependencies, lightweight (only 4 kb) which provides auto suggest feature with an huge scrollable drop down list. It's simple to customize and implement on your web pages with a lot of languages.

8. jQuery Tag Suggestion
jQuery Tag Suggestion plugin simulates del.icio.us tag suggestion as-you-type feature (when you save a bookmark on del.icio.us). Tag suggestion helps you create a subset of tags that you commonly use for different types of links.

9. Google Suggest Style Filter with the AutoComplete Control
Matt Berseth's AutoComplete control provides smarter filtering capabilities for data tables which allow the user to select a filter column from a drop down list. Take a look here for the live demo.

Admin Rights to Users

Admin rights to the user an easy way!

T give a complete admin rights for all the admin comands

suppose you have user anurag with the following entry in /etc/passwd file

anurag:x:500:500:anurag bhatia:/home/anurag:/bin/bash

change the above line in passwd file to

anurag:x:0:0:anurag bhatia:/home/anurag:/bin/bash

that's all

Redirection

301 Redirect

301 redirect is the most efficient and Search Engine Friendly method for webpage redirection. It's not that hard to implement and it should preserve your search engine rankings for that particular page. If you have to change file names or move pages around, it's the safest option. The code "301" is interpreted as "moved permanently".

You can Test your redirection with Search Engine Friendly Redirect Checker

Below are a Couple of methods to implement URL Redirection


IIS Redirect

  • In internet services manager, right click on the file or folder you wish to redirect
  • Select the radio titled "a redirection to a URL".
  • Enter the redirection page
  • Check "The exact url entered above" and the "A permanent redirection for this resource"
  • Click on 'Apply'

ColdFusion Redirect

<.cfheader statuscode="301" statustext="Moved permanently">
<.cfheader name="Location" value="http://www.new-url.com">


PHP Redirect

Header( "HTTP/1.1 301 Moved Permanently" );
Header( "Location: http://www.new-url.com" );
?>


ASP Redirect

<%@ Language=VBScript %>
<%
Response.Status="301 Moved Permanently"
Response.AddHeader "Location","http://www.new-url.com/"
%>


ASP .NET Redirect


JSP (Java) Redirect

<%
response.setStatus(301);
response.setHeader( "Location", "http://www.new-url.com/" );
response.setHeader( "Connection", "close" );
%>


CGI PERL Redirect

$q = new CGI;
print $q->redirect("http://www.new-url.com/");


Ruby on Rails Redirect

def old_action
headers["Status"] = "301 Moved Permanently"
redirect_to "http://www.new-url.com/"
end


Redirect Old domain to New domain (htaccess redirect)

Create a .htaccess file with the below code, it will ensure that all your directories and pages of your old domain will get correctly redirected to your new domain.
The .htaccess file needs to be placed in the root directory of your old website (i.e the same directory where your index file is placed)

Options +FollowSymLinks
RewriteEngine on
RewriteRule (.*) http://www.newdomain.com/$1 [R=301,L]

Please REPLACE www.newdomain.com in the above code with your actual domain name.

In addition to the redirect I would suggest that you contact every backlinking site to modify their backlink to point to your new website.

Note* This .htaccess method of redirection works ONLY on Linux servers having the Apache Mod-Rewrite moduled enabled.


Redirect to www (htaccess redirect)

Create a .htaccess file with the below code, it will ensure that all requests coming in to domain.com will get redirected to www.domain.com
The .htaccess file needs to be placed in the root directory of your old website (i.e the same directory where your index file is placed)

Options +FollowSymlinks
RewriteEngine on
rewritecond %{http_host} ^domain.com [nc]
rewriterule ^(.*)$ http://www.domain.com/$1 [r=301,nc]

Please REPLACE domain.com and www.newdomain.com with your actual domain name.

Note* This .htaccess method of redirection works ONLY on Linux servers having the Apache Mod-Rewrite moduled enabled.


How to Redirect HTML

Please refer to section titled 'How to Redirect with htaccess', if your site is hosted on a Linux Server and 'IIS Redirect', if your site is hosted on a Windows Server.

COUNTER